If you’ve already started selling or advertising your business on Facebook, you may have heard a thing or two about Facebook Business Manager (aka Meta Business Suite). If not, don’t
Facebook Business Manager is a tool that allows businesses to manage their Facebook business all in one place. Using Business Manager can save you time when it comes to managing your Facebook page, creating and running ads, and working with team members or contractors.
Read on to find out everything you need to know about using Business Manager, including how to set it up and use it like a pro.
What Is Facebook Business Manager?
Facebook Business Manager, also known as Meta Business Suite, is a free platform that businesses can use to manage their presence on Facebook and Instagram.
But what can you use Facebook Business Manager for? You can:
- Create and manage multiple Facebook and Instagram pages, audience lists, or product
catalogs—all in one place! - Track your Facebook and Instagram ads with detailed information on your marketing spending and impressions.
- Delegate permissions, roles, and tasks to team members.
- Work with an agency or social media manager to monitor work quality while tracking what they’re doing for you.
- Keep your business page more secure and run your team without sharing your personal Facebook content with others.
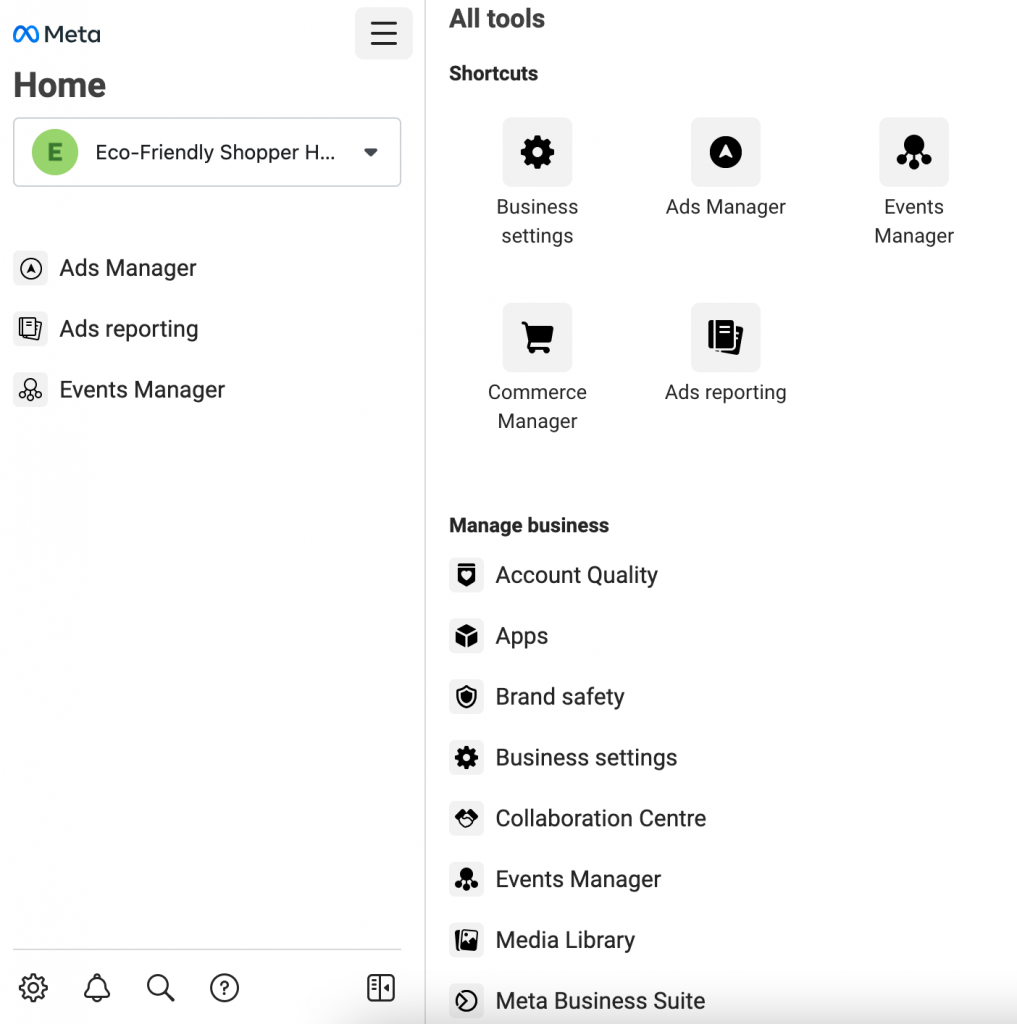
Business Manager has lots of tools for managing your presence on Facebook and Instagram
Do I Need Facebook Business Manager?
If you’re still not sure you should use Facebook Business Manager, see if the following applies to you. These are the most common cases for when you would need Facebook Business Manager:
- You run multiple Facebook or Instagram pages or ad accounts. This especially applies if you have several business locations or
sub-brands. - You have employees who manage your Facebook or Instagram business pages.
- You work with contractors to create, run, or manage your pages or ads. You want to keep your business secure by having complete control over access and permissions when working with contractors.
- You want to request access to other Facebook pages and ad accounts or share your own with other agencies.
Essentially, Facebook Business Manager makes managing your Facebook business page easier.
In this post, we’ll walk you through the process of using and setting up a Business Manager. Let’s get started!
Access Levels on Facebook Business Manager
You can give different people permission to do different things in Business Manager. That way, you have more control over your business and its assets.
There are two levels of permissions in Business Manager:
- Business admins: They can control everything in Business Manager, including adding or removing team members and changing or deleting the company.
- Business employees: They can access all data in the company’s settings but cannot make any changes. They can be assigned roles by business admins.
What You Can Manage with Facebook Business Manager
Here are all the assets you can control via Business Manager:
Facebook and Instagram Pages
Facebook and Instagram pages are public profiles created for your business. They are controlled by the business they represent and can only be claimed by one Business Manager. However, multiple accounts can control a page, posting and running ads.
Ad Accounts
An ad account is where you pay for your Facebook or Instagram ads and see how your ads perform. An ad account should have an associated payment method and an authorized person who will pay for ad campaigns using that account.
Since you’re paying for ads as a business owner, your Facebook Business Manager can run your ad account. You can also share your ad account with an agency or contractor so that they can run ads on your behalf.
Learn more: How to Advertise on Facebook for Beginners
Pixels
The Facebook pixel is a tool that helps you understand the actions people take on your website. For example, it can tell you which product pages are visited the most or how many visitors abandoned their cart without making a purchase.
Each Business Manager can create up to five pixels, which can be shared with Business Manager partners. If someone else is managing your ads for you, you can let them manage your pixels.
Pixel is essential for advertising, as it helps measure the effectiveness of your ads. Learn more about Facebook pixel and how to use it.
Audiences
A Facebook audience is the group of people you want to reach with your ads. Basically, it is a set of parameters that allows you to target your potential customers based on demographics, locations, and interests. You can specify and save those parameters, using them to create your Facebook or Instagram ads.
In Facebook Business Manager, you can share access with agencies or contractors so that they can access the audiences you’ve created.
How to Set up a Facebook Business Manager Account
Setting up an account for Facebook Business Manager is quite simple. Let’s break down the process:
- Go to facebook.com/business and log in. You can also create a new account if you don’t have one yet.
- Enter your name, your business name, and your business email address.
- Choose whether you’re setting up Business Manager for yourself or someone else.
- Select the pages and ad accounts you want to add to Business Manager.
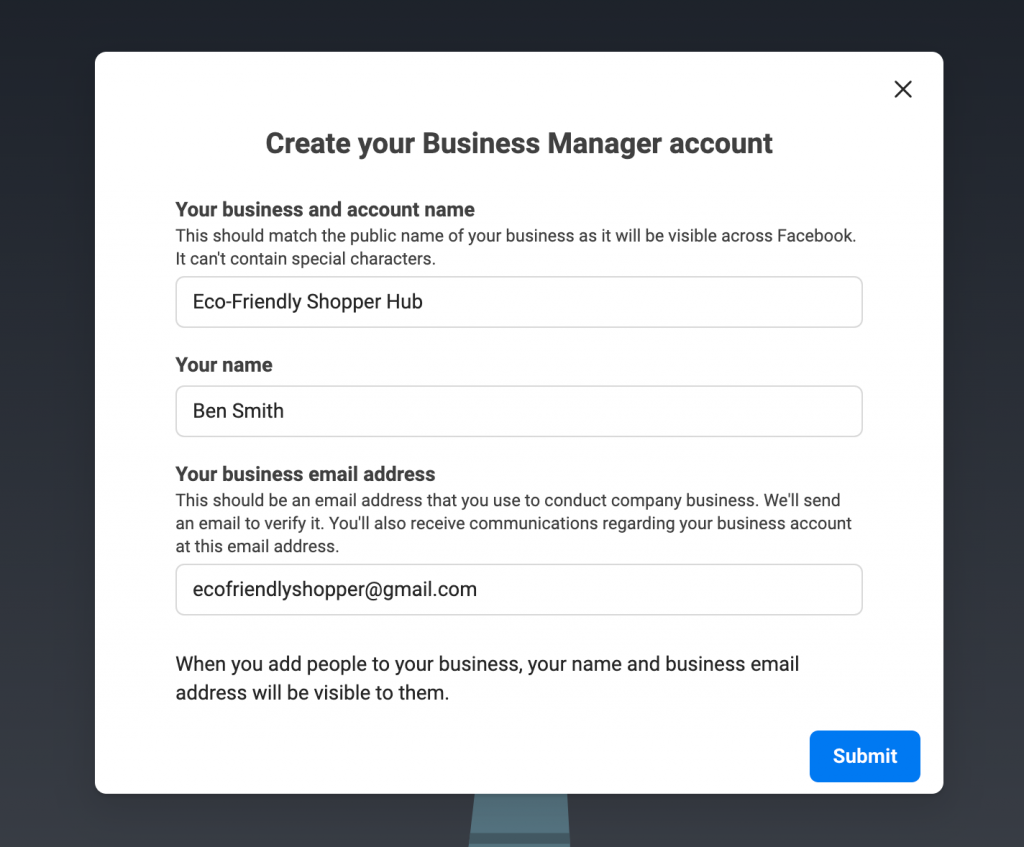
The process of setting up a Facebook Business Manager account
Now that your Business Manager is created, it’s time to add your assets, like pages, ad accounts, and pixels.
Also, if you have team members or contractors, you need to assign permissions to them so that they can start working in your Business Manager. We’ll explain how to do that below, so read on!
How to Add Assets and Assign Permissions in Facebook Business Manager
Facebook Business Manager is a versatile tool you can use in many different ways. To help you get started, we’ll go over the steps needed for the most common cases.
The directions below explain how to add assets in Facebook Business Manager, such as pages and ad accounts. You’ll also learn how to assign permissions to team members or agencies in Business Manager.
How to connect a Facebook page:
- Go to your Facebook Business Manager and find the “Accounts” section.
- Choose “Pages” and click “Add a Page.”
- Enter the Facebook page name or URL and click “Add Page.”
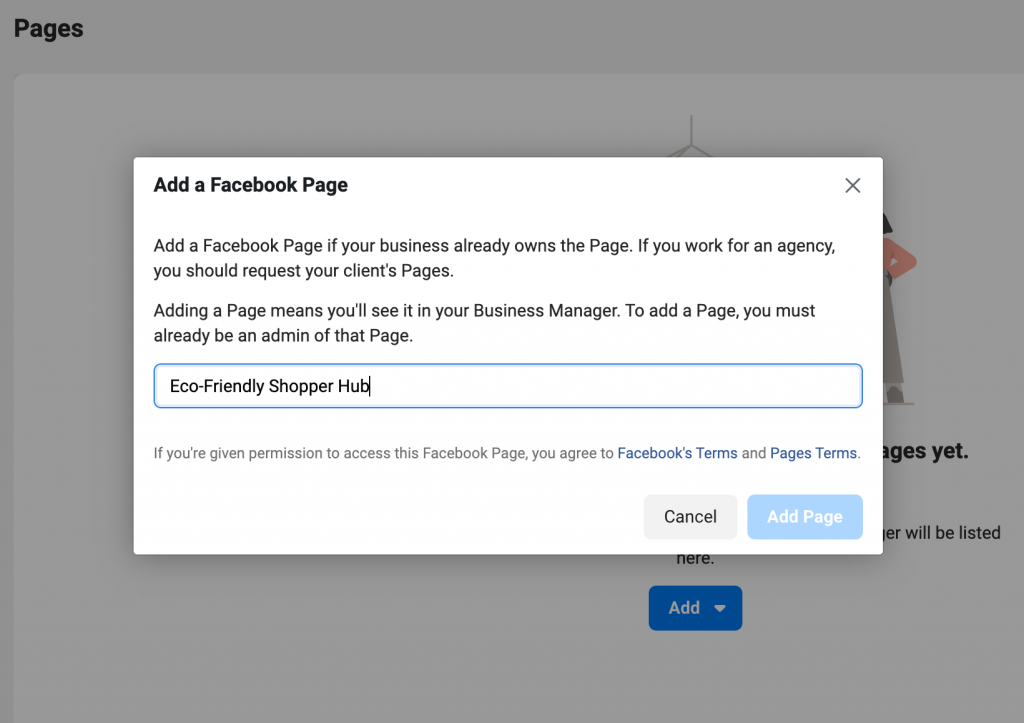
If you are a page admin, your claim will be instantly approved. If you are not, the current page admin will receive a notification to approve the claim request.
How to connect an Instagram business account:
- Go to your Facebook Business Manager and find the “Accounts” section.
- Choose “Instagram Accounts” and click “Add.”
- Click “Connect Your Instagram Account” and log in to your Instagram account.
- Optional: Select the ad accounts and pages that you’d like to assign.
- Click “Finish.”
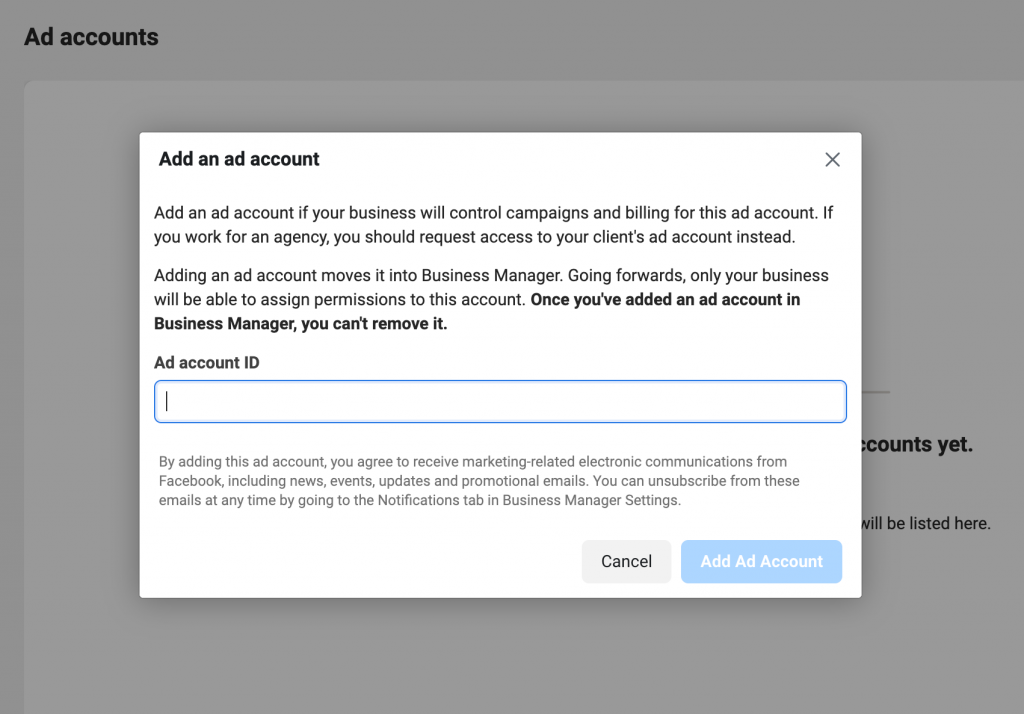
How to add an ad account:
- Go to your Facebook Business Manager and find the “Accounts” section.
- Click “Add an ad account”.
- Enter the ad account ID and click “Add Ad Account.
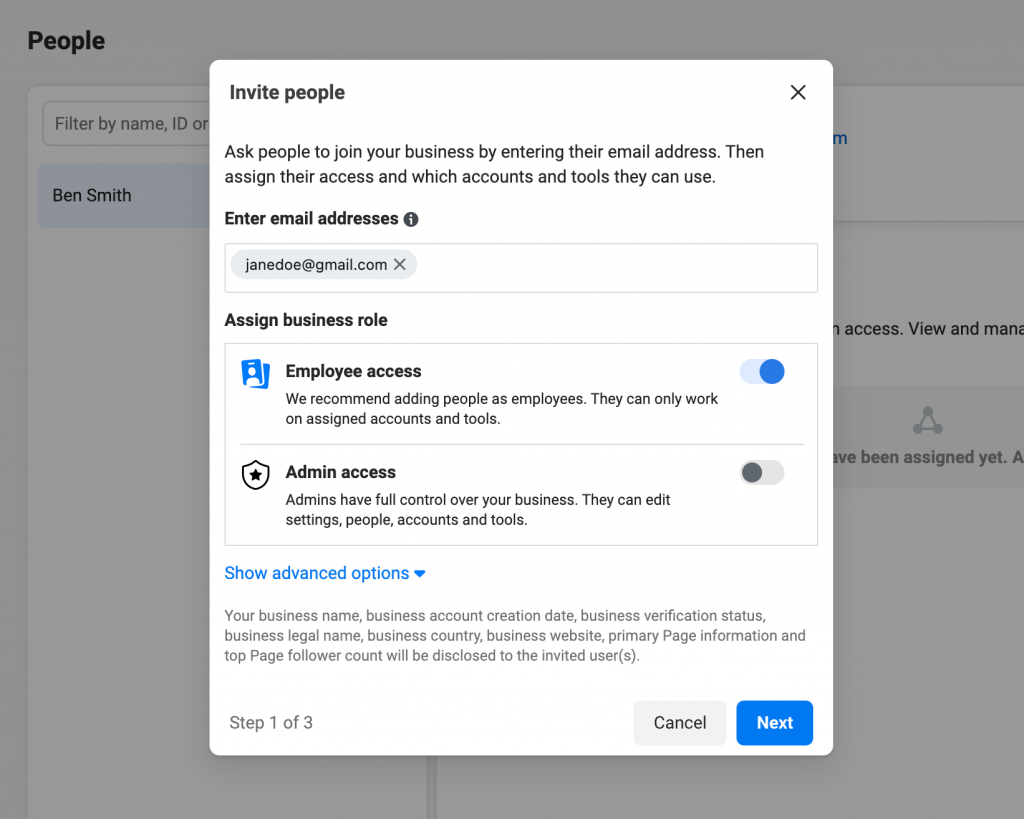
How to assign team members:
- Go to your Facebook Business Manager and find the ‘Users’ section.”
- Go to “People” and click “Add.”
- Enter the email address of the person you want to give permissions to.
- Assign either employee or admin access. Once you’re done, click “Next.” Note: It’s recommended to add at least two people as Business Manager admins and the rest as employees.
- Select accounts and tools you want this person to work with and have access to. Then click “Invite.”
How to add an agency or a consultant:
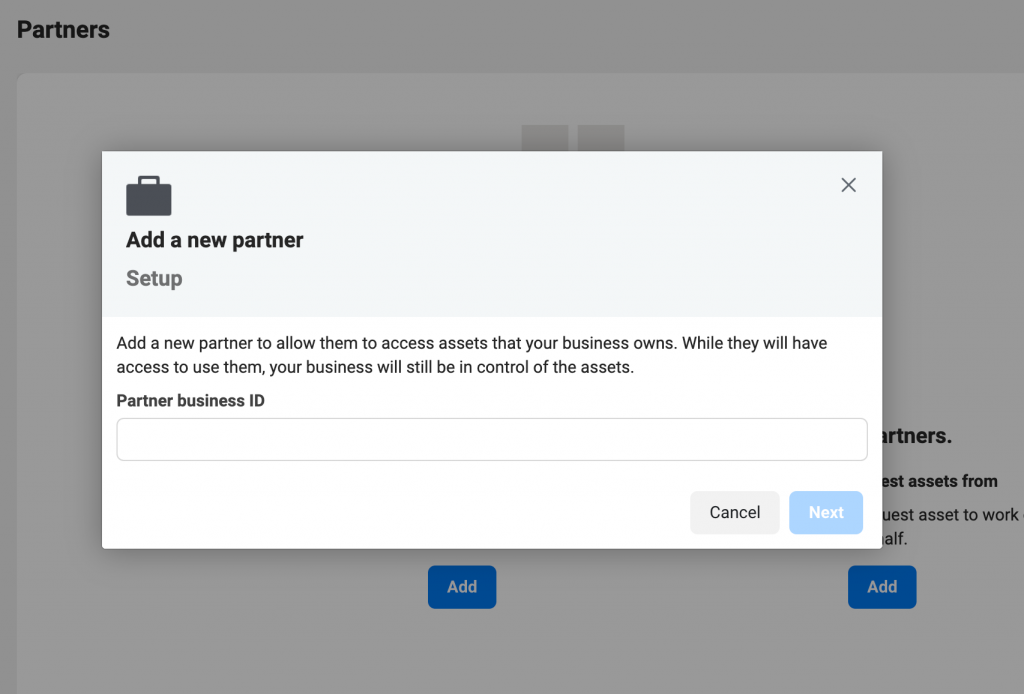
- Go to your Facebook Business Manager and find the “Users” section.
- Go to “Partners” and click “Add” under “Partner to share assets with.”
- Enter the partner business ID and click “Next.” If you don’t know your partner’s business ID, ask them to send it to you using these instructions.
- Give the partner access to assets you want them to work on and assign a role for them.
- Click “Save.”
Learn More About Using Facebook for Business
Running a business can be very
Facebook Business Manager is one of those tools. It helps streamline your social media marketing efforts by giving you control over all your Facebook assets in one place. So don’t hesitate to try it out by using this article as your guide.
If you’d like to learn more about using Facebook for your business, check out the “Sell on Facebook” collection in our blog. It contains articles and podcasts that explain the
- Sell on Facebook: Blow Up Your Sales With Social Selling
- How Does Facebook Work for Small Businesses?
- How to Receive Payments on a Facebook Business Page
- How to Grow a Facebook Business Page for Free
- What to Post on Facebook: 20 Post Ideas for Your Business Page
- A
Step-By-Step Guide to Using Facebook Business Manager - 7 Strategies to Boost Sales With Facebook Marketing
- How to Sell Products Using Facebook Live Shopping
- Make your Products More Discoverable on Facebook & Instagram
- What Is Facebook Pay, and Should Your Company Use It?
- A Beginner’s Guide to Selling on Facebook Marketplace
- Sell on Facebook Messenger
- Sell Products in Facebook Shops


